Wednesday, October 31, 2012

Wallpaper Goes Paperless

While I love the wallpaper look I really don't want to use it. Here is why... Removing wallpaper can be a hassle! The process of taking the wallpaper down can even damage your drywall. So how to add the wallpaper look without the paper (and the glue!!)? Paint of course! Here are some inspirations:


If you can draw, this hand-painted mural is a great way to add boldness to any room in your home.

Bravo Interior Design


In this room by Faiella Design, the mural is extended to the ceiling as well:

Faiella Design


If freehand drawing is not your thing, you can always use stencils:
 
Maureen Mccluskey


Designamour


akadesign

As we see, paint is a  great (and inexpensive) way to add some art to an empty wall or even to transform a room!

Wednesday, October 17, 2012

Meatless Roast Recipe

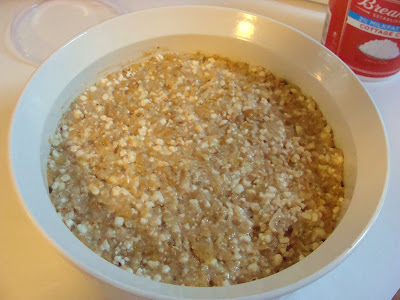
I have made this meatless roast three times, and what I can say is... THIS. IS. VERY. TASTY. Maybe it does not look that tasty. But it is!

Prep time for this roast is around 10 minutes and cooking time is 1 hour.

Here is your step-by-step recipe:

1. Preheat your oven to 350 degrees F.

2. Beat 4 eggs for 1-2 minutes


3. Add the following ingredients to the eggs:

- cottage cheese (16 oz)


- chopped walnuts (1 cup)

- vegetable oil (1/4 cup)
- chopped onion (1/4 cup)
- dry onion soup mix (1 ounce envelope)
- corn flakes (2 cups)


4. Mix everything together.


 5. Spoon into greased pan.


6. Bake for 60 minutes.


7. Enjoy your meatless roast!


Link up:
MyMeatlessMondays

Sunday, October 14, 2012

My First Artwork

I have been looking for an artwork for my living room forever. However I could not find an affordable one that I really like... So... I thought... why not do one myself? With no techniques or knowledge I just went to the art store and grabbed some oil paint tubes, brushes, oil thinner, and a 36x48 stretched canvas (yes, I wanted to go big!). I set my "studio" in the garage, spent about 5 hours there, and here is the final work... My desire was to finish my art as soon as possible so I could hang it on wall at the end of the day. The problem is (I said before I had no knowledge!) oil painting takes a week to be dry to the touch. And a year to be completely dry! Google helped me with this information! So here I am waiting, waiting, waiting while "she" is there on the table in my studio (I mean, garage!).


"Trinity" by Me


Tuesday, October 9, 2012

Next Project - Hollow Core Door Makeover

My next project will be upgrading an old ugly hollow core door. I have been searching online for some info on how to do this work, and today I finally came across with Teresa's blog "Our Old Abode." She has done a door makeover and her work was my motivation to actually start my project ASAP.


Our Old Abode
It does not even look the same door! Great job Teresa! 

Monday, October 8, 2012

Fireplace Makeover

Finally here... My fireplace makeover! That's what paint and love can do for you!

After:


Before... So ugly!


Don't forget to enter:
 
$25 Target Gift Card Giveaway ends 12/12/2012
 
Click here to see instructions!
 
GIVEAWAY
 
 Link Up Parties:
 
shabby creek cottage
 TDC Before and After

UndertheTableandDreaming{Primp}

Sunday, October 7, 2012

Wood Paneling Fireplace Makeover - How to Fill Grooves

The look of my fireplace was bothering me for long, long time...So I decided to get some paint and do something about the eyesore in my living room... It was a long and dusty journey. However I am happy I did it!

My "before" picture:


The beginning of the process... Sanding the wood paneling to remove the sheen...


 At this point I had dust everywhere!


 I love when she looks at me trying to figure out what I am doing...


In order to remove whatever was left from the paneling old finish I wiped the paneling down with Sander Deglosser (from Home Depot).


After the paneling was dried, I covered the grooves with latex primer...


Then I filled the grooves with Patch-N-Paint (spackle), let it dry and sanded smooth. I repeated this at least twice.


Then I applied the latex primer with a roller... I used the tip of a small roller to paint the trim on the top.


 Ah... Here I started feeling happy already with the results... the old brown wood paneling was gone and the fireplace was ready to be painted!